Mastering Visual Composition with 20 Procreate Brushes Frames and Borders
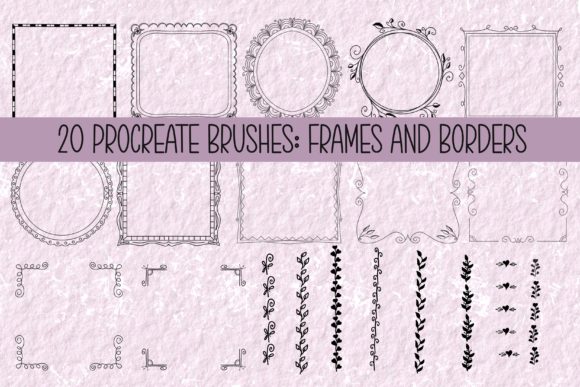
Digital illustration on the iPad has evolved from a niche hobby into a robust professional workflow for designers, educators, and content creators. Yet, even seasoned artists often stumble when it comes to the final presentation of their work. A stunning character design or a beautifully lettered quote can lose its impact if it lacks proper containment or visual structure. This is where a specialized toolset becomes invaluable. The 20 Procreate Brushes Frames and Borders collection offers a streamlined solution for artists who want to elevate their composition without spending hours drawing repetitive geometric lines or organic vines by hand.
However, simply downloading a new brush set does not guarantee better art. Many users encounter friction not because the tools are flawed, but because they misunderstand how to integrate them into their existing workflow. By addressing common pitfalls in selection, installation, and application, you can ensure that these digital assets serve your creative vision rather than complicating it.
Understanding Compatibility and Installation Nuances
The most frequent hurdle for new users is not artistic, but technical. Before you even open the file, it is crucial to recognize the specific ecosystem requirements. This brush set is exclusively compatible with the Procreate app, which itself runs only on iPad, iPad Pro, and iPad Air devices. Attempting to use these files on an iPhone, Android tablet, or desktop software like Photoshop will result in immediate frustration.
A common mistake occurs during the installation phase. Users often download the ZIP file and expect the brushes to appear automatically. They do not. You must first locate the downloaded file in your iPad’s Files folder. From there, a single tap unzips the archive. Only after this step should you tap the unzipped file to trigger the automatic import into Procreate. If you skip the unzipping step or try to import from a cloud preview rather than the local storage, the import may fail or create corrupted duplicates. Once imported correctly, the set will appear at the very top of your Brush Studio, ready for immediate use. Taking thirty seconds to follow this precise sequence saves significant time troubleshooting later.
The Trap of Over-Decoration
Once the brushes are installed, the temptation is to use them everywhere. This is a classic beginner error. The set includes twelve square frame stamp brushes and eight dynamic border vine brushes. While versatile, they are distinct tools with different purposes. Using a heavy, ornate square frame on a delicate, minimalist sketch creates visual dissonance. The frame competes with the artwork rather than supporting it.
To avoid this, consider the hierarchy of your composition. Ask yourself: What is the focal point? If your illustration is complex and detailed, opt for a simpler border or use the frame sparingly as a background element with reduced opacity. Conversely, if your artwork is simple—such as a single line-art icon or a short text quote—a more intricate vine border can add necessary weight and interest. The goal is balance. A good rule of thumb is to let the frame enhance the narrative, not distract from it. For instance, a botanical illustration pairs naturally with the dynamic vine brushes, creating a cohesive organic theme, whereas a tech-focused graphic might benefit more from the clean lines of the square stamps.
Misunderstanding "Stamp" versus "Dynamic" Brushes
Not all brushes in this collection behave the same way, and treating them identically leads to inefficient workflows. The twelve square frame brushes are "stamps." This means they apply a complete, pre-defined shape in a single stroke. They are ideal for quick layouts, social media posts, or consistent branding elements. However, because they are static, you cannot easily adjust the curvature or flow of the line after placement without transforming the entire layer.
In contrast, the eight dynamic border vine brushes are designed for freehand drawing. They respond to your pressure and speed, allowing for organic, flowing lines that can wrap around irregular shapes. A common oversight is using the stamp brushes for organic compositions, resulting in rigid, unnatural borders that clash with soft, hand-drawn elements. Alternatively, users might try to manually draw a perfect square using the vine brushes, which is unnecessarily difficult and time-consuming.
Practical Advice: Use the square stamps for structured content like quotes, product photos, or grid-based layouts. Reserve the dynamic vines for journaling, scrapbooking styles, or framing illustrations with irregular edges. Understanding this distinction allows you to work faster and achieve a more polished look.
Resolution and Scalability Concerns
Digital artists often overlook resolution until it is too late. When using stamp brushes, the size at which you apply the brush determines its pixel density. If you create a small frame and then scale it up significantly to fit a larger canvas, you may notice pixelation or blurriness. This degrades the professional quality of your work, especially if it is intended for print or high-resolution displays.
To mitigate this, always apply your frame brushes at or near the final size you intend to use. If you need a larger frame, it is better to apply the brush at a larger size initially rather than stretching a small one. Additionally, keep your canvas dimensions in mind. If you are designing for Instagram stories, a standard HD canvas may suffice. However, if you are creating print-on-demand products or large-format prints, ensure your canvas is set to 300 DPI before importing and using these brushes. This ensures that the crisp edges of the square frames and the fine details of the vine brushes remain sharp.
Color and Layer Management Best Practices
Another area where users struggle is layer management. It is tempting to draw your frame directly on the same layer as your artwork. This makes editing nearly impossible. If you decide to change the color of the frame or adjust its position, you risk altering your main illustration.
Always create a new layer specifically for your frames and borders. This non-destructive approach allows you to experiment freely. You can change the blend mode, adjust opacity, or apply clipping masks to tint the frame without affecting the underlying art. For example, setting a vine border layer to "Multiply" can make it interact naturally with textured backgrounds, while keeping it on a separate layer ensures you can delete or move it if the composition feels cluttered.
Furthermore, consider color harmony. The default black color of the brushes is not always the best choice. Use the color picker to sample hues from your main illustration for the frame. This creates a unified, cohesive design. A monochromatic scheme, where the frame is a darker or lighter shade of the primary color, often looks more sophisticated than high-contrast black borders.
Making the Right Choice for Your Workflow
Before integrating the 20 Procreate Brushes Frames and Borders into your daily routine, evaluate your current needs. Are you creating content for social media? Do you design digital planners? Or are you illustrating children’s books? Each use case benefits from these tools differently. Social media managers will appreciate the speed of the square stamps for quick quote graphics. Illustrators will value the organic feel of the vine brushes for adding depth to page layouts.
By avoiding the common mistakes of improper installation, over-decoration, and poor layer management, you transform this brush set from a simple download into a powerful asset. It streamlines your process, ensuring that your final pieces look polished and professional. Remember, the tool is only as good as the intention behind its use. Take the time to understand the mechanics, respect the composition, and manage your layers wisely. With these practices in place, you will find that framing your art becomes less of a chore and more of an enjoyable part of the creative process.