Mastering Glowing Neon Photoshop Brushes for Efficient Digital Design
In the fast-paced world of digital design, efficiency is not just a preference; it is a necessity. Whether you are a graphic designer working on a tight deadline, a marketer creating social media assets, or an artist exploring new visual styles, the tools you choose define your workflow. Glowing Neon Photoshop Brushes represent a specialized asset set designed to streamline the creation of luminous, high-contrast neon effects. Rather than spending hours manually painting light sources and adjusting layer opacities, these brushes allow designers to achieve realistic glowing results in a single move. This article explores how to integrate this toolset into your creative process, ensuring consistent quality and saving valuable production time.
Understanding the Asset Ecosystem
To fully leverage the potential of Glowing Neon Photoshop Brushes, it is essential to understand that this is not merely a collection of brush tips. It is a cohesive ecosystem comprising three distinct file types that work in tandem: brushes, layer styles, and color swatches. Each component plays a critical role in achieving the authentic look of illuminated gas tubes and LED strips.
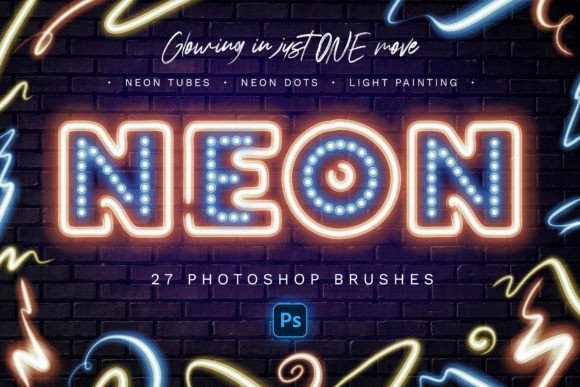
The core of the package is the .ABR file, which contains 27 specialized brushes. These are categorized to handle different aspects of neon design, from solid tubes to atmospheric glow. However, a brush alone cannot replicate the physics of light. This is where the .ASL file comes into play. This layer style file contains pre-configured settings for outer glows, inner glows, and blending options that mimic the way light disperses in a dark environment. Finally, the .ACO file provides a curated palette of neon colors. Standard RGB values often fail to capture the intensity of real neon; these swatches are calibrated to ensure vibrancy and realism.
By using all three files together, you eliminate the guesswork involved in color matching and effect tuning. This integrated approach ensures that every element you draw maintains visual consistency, a crucial factor for professional branding and high-quality art direction.
Workflow Integration and Preparation
Integrating new assets into an existing workflow requires a moment of preparation. Before beginning a project, load the .ABR, .ASL, and .ACO files into Photoshop. This initial setup takes seconds but pays dividends throughout the design process. Organizing these assets in a dedicated folder within your library allows for quick access during future projects, supporting long-term efficiency.
Consider where neon elements fit into your broader design goals. Are you creating a retro-themed poster? A futuristic UI interface? Or perhaps adding accent lighting to a photograph? Understanding the context helps you select the right brush from the start. For instance, if you are designing a logo, precision is key. If you are creating background art, atmospheric glow may be more important than sharp lines.
Compatibility is another practical consideration. These brushes are designed to work with standard Photoshop versions, but utilizing a graphics tablet enhances the experience significantly. The inclusion of pen-pressure sensitive brushes means that line weight and opacity can vary naturally with your hand movement, mimicking the organic feel of drawing with a physical light pen. While mouse users can still achieve excellent results using the Stroke Path function, tablet users will find the workflow more intuitive and expressive.
Practical Application Techniques
The versatility of the 27 brushes allows for various implementation strategies. Here is how to apply them effectively in real-world scenarios:
- Neon Tubes: The set includes 9 specific neon tube brushes. These are ideal for creating text or defined shapes. To use them, simply select the brush, choose a color from the included swatches, and draw. Apply the special layer style from the .ASL file immediately after drawing to activate the realistic glow. This one-move process replaces multiple steps of manual layer duplication and filter application.
- Light Painting: For more abstract or artistic effects, use the 3 Light Painting brushes. These are perfect for adding dynamic streaks of light to photographs or creating energetic backgrounds. They work well when layered over darker images to simulate long-exposure photography effects.
- Multiline and Glow Effects: The 6 Multiline brushes and 3 Glow brushes add depth and complexity. Use these to create halos around primary neon elements or to simulate the diffusion of light in foggy or humid environments. This adds a layer of realism that flat designs often lack.
- Pen Pressure Sensitivity: The 5 Neon Pen Pressure brushes are designed for tablet users. They respond to the speed and pressure of your stroke, allowing for tapered ends and variable brightness. This is particularly useful for handwritten neon signs or organic, flowing designs.
- Dot Accents: The single Dot Brush is a small but powerful tool for adding specular highlights or simulating individual LED bulbs within a larger structure.
When drawing with a mouse, the Stroke Path function is your best ally. Create a path using the Pen Tool for smooth, precise curves, then right-click and select "Stroke Path" with your chosen neon brush. This method ensures clean, vector-like precision while still applying the textured, glowing effect of the brush.
Quality Control and Consistency
Maintaining visual consistency is vital in professional design. The included .PSD template serves as an excellent starting point for quality control. It demonstrates how the layers should be structured and how the layer styles interact with different background colors. By using this template, you can ensure that your neon elements look correct across various mediums, from web banners to print materials.
Pay attention to color selection. The provided swatches are not random; they are selected for their ability to glow realistically against dark backgrounds. Using colors outside this palette may result in dull or unrealistic effects. If you must use custom colors, test them against the layer style settings to ensure the glow intensity remains appropriate.
Additionally, consider the hierarchy of light. In a real-world scenario, brighter neon tubes cast light on surrounding objects. Use the glow brushes to subtly illuminate nearby elements in your composition. This attention to detail elevates the design from a simple graphic to a cohesive visual scene.
Efficiency in Professional Projects
For entrepreneurs and small business owners, time is a resource as valuable as money. Using Glowing Neon Photoshop Brushes reduces the time spent on repetitive tasks. Instead of building neon effects from scratch for every client project, you can deploy these assets to produce high-quality results in minutes. This speed allows for more iteration and experimentation, leading to better final outcomes.
Marketers and bloggers can use these brushes to create eye-catching headers and social media graphics. Neon aesthetics are currently popular in digital culture, associated with energy, nightlife, and technology. By having a reliable toolset, you can quickly adapt your visual content to trending styles without needing advanced illustration skills.
Educators and freelancers will appreciate the ease of use. The learning curve is minimal, allowing you to focus on creativity rather than technical troubleshooting. The clear organization of the brushes and the inclusion of examples (.JPG files) provide immediate visual references, helping you understand what is possible with each tool.
Long-Term Value and Adaptability
Investing in high-quality assets like Glowing Neon Photoshop Brushes offers long-term value. Unlike temporary trends, the need for efficient, high-quality lighting effects is permanent in digital design. As your skills grow, you may find new ways to combine these brushes with other techniques, such as masking, blending modes, and animation.
Furthermore, the modular nature of the set allows for customization. You can adjust the layer styles to create softer glows for daytime scenes or intensify them for night-time visuals. The brushes can be resized and rotated to fit any composition. This adaptability ensures that the toolset remains relevant across diverse projects and evolving design requirements.
In conclusion, integrating Glowing Neon Photoshop Brushes into your workflow is a strategic decision for any digital creator. By combining specialized brushes, precise layer styles, and optimized color swatches, you gain the ability to produce realistic neon effects with unprecedented speed and consistency. Whether you are drafting a quick concept or polishing a final deliverable, this toolset empowers you to execute your vision efficiently, leaving more room for creativity and strategic thinking in your design process.