Drawing Procreate Brushes: Elevate Your Digital Sketching Workflow
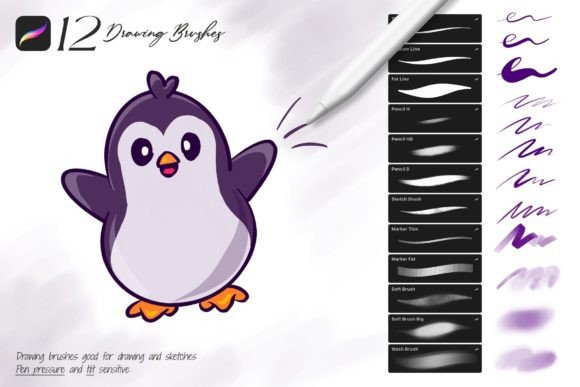
If you have ever stared at a blank canvas in Procreate, feeling paralyzed by the sheer number of default brush options, you are not alone. The quest for the perfect digital tool often leads artists down a rabbit hole of endless tweaking and testing. This is where a curated set like Drawing Procreate Brushes changes the game. Instead of spending hours configuring opacity curves or jitter settings, this collection offers twelve specialized tools designed to mimic the tactile feel of traditional media while leveraging the power of the Apple Pencil. It is not just about having more brushes; it is about having the right brushes that respond intuitively to your hand movements, allowing you to focus on creativity rather than technical friction.
The Immediate Impact on Quick Conceptualization
For concept artists, illustrators, and even hobbyists, speed is often as valuable as precision. The initial sketch phase is messy, energetic, and crucial for capturing the essence of an idea. The three pencil brushes included in this set are engineered specifically for this stage. Because they are fully pen pressure and tilt-sensitive, they replicate the behavior of real graphite. When you hold the Apple Pencil at a shallow angle, the brush widens and softens, perfect for shading large areas quickly. Press harder, and the line darkens and sharpens, ideal for defining core structures.
Consider a character designer working on a tight deadline. With standard digital brushes, achieving that organic, scratchy look of a quick study can feel sterile or overly polished. These cool pencil brushes allow for rapid iteration. You can throw down loose gestures, refine the anatomy with harder strokes, and add depth with tilt-based shading without switching tools constantly. This fluidity helps maintain the "flow state," keeping the creative momentum alive rather than interrupting it to adjust settings.
From Rough Sketches to Clean Line Art
One of the most challenging transitions in digital art is moving from a rough, energetic sketch to clean, confident line art. Many artists struggle with lines that look too uniform or lack personality. The three outline brushes in this Drawing Procreate Brushes set address this by offering varying degrees of stability and texture. Whether you are creating crisp vector-like lines for logo design or retaining some organic wobble for a hand-drawn comic aesthetic, these tools provide the necessary control.
Imagine an indie comic creator outlining a complex scene. Using a generic round brush might result in monotonous line weight. However, with these specialized outline brushes, the line weight can vary naturally based on speed and pressure, adding dynamism to the final artwork. This makes the process of inking less of a chore and more of an expressive extension of the drawing phase. The ease of painting clean outlines means less time spent on the eraser tool and more time focusing on composition and storytelling.
Adding Depth with Soft Shadows and Markers
Shading is often where digital paintings lose their charm if not handled correctly. Hard-edged shadows can look flat, while overly blurred gradients can appear muddy. The inclusion of three soft brushes for shadows provides a middle ground that is incredibly versatile. These brushes are designed to lay down color smoothly, allowing for easy blending directly on the canvas. For portrait artists, this is invaluable for rendering skin tones and subtle facial contours without visible brush strokes.
Furthermore, the three marker brushes offer a distinct advantage for color design sketches. Markers behave differently than pencils or paints; they lay down saturated color that can be layered for depth. In architectural visualization or fashion design, marker-style rendering is a industry standard for quick mockups. These digital markers allow you to simulate that translucent, layerable effect. You can quickly block in colors for a clothing design, overlaying shades to indicate fabric folds and lighting conditions. The ability to switch seamlessly between pencil sketching, marker coloring, and soft shadowing within a single brush set streamlines the entire workflow from concept to presentation.
Who Benefits Most from This Toolset?
The versatility of Drawing Procreate Brushes means it serves a wide array of users, but certain groups will find particular value in its specific configuration.
- Students and Beginners: For those new to digital art, the learning curve of Procreate can be steep. Having a pre-configured set removes the guesswork. Instead of wondering which brush to use for shading, they have a dedicated tool that works predictably, allowing them to focus on fundamental skills like perspective and anatomy.
- Professional Illustrators: Even seasoned pros benefit from a reliable "go-to" kit. When starting a new project, setting up custom brushes can eat into billable hours. This set provides a professional-grade starting point that is easy to customize further if needed, ensuring consistency across different projects.
- Architects and Designers: The marker and pencil combination is ideal for quick visualizations. Being able to sketch a building facade with pencil precision and then rapidly apply marker-style color blocks helps in communicating ideas to clients effectively during meetings.
Practical Considerations and Limitations
Before diving in, it is essential to understand the ecosystem these brushes operate within. These tools are compatible ONLY with the Procreate application on Apple iPad. They will not work with Adobe Photoshop, Clip Studio Paint, or any desktop-based software. This is a crucial distinction for users who rely on a cross-platform workflow. If your primary workspace is a desktop computer, this set will not integrate into your pipeline. However, for iPad users, the integration is seamless.
Another consideration is the nature of digital customization. While the brushes are described as "easy to customize," this requires a basic understanding of Procreate’s brush studio. The default settings are optimized for general use, but every artist’s hand is different. Some may prefer a smoother glide, while others want more tooth or texture. The strength of this set lies in its solid foundation; it gives you a highly functional baseline that you can tweak, rather than forcing you to build from scratch.
Installation and Getting Started
Getting started with your new tools is straightforward, designed to minimize setup time. Once you have purchased and downloaded the file directly to your iPad, the process is automatic. Simply locate the file named Drawing_ by_Sko4 .brushset and tap on it. Procreate will recognize the file type and automatically install all twelve brushes. They will appear at the very top of your brush list, ready for immediate use. There is no need to import them individually or navigate complex menus. This immediacy allows you to jump straight into creating, whether you have five minutes to spare or an entire afternoon to dedicate to your craft.
In a digital landscape crowded with thousands of free and paid assets, finding a cohesive, purpose-driven set like Drawing Procreate Brushes is a relief. It strips away the unnecessary complexity and delivers exactly what is needed for high-quality sketching, outlining, and shading. By focusing on the core elements of drawing—pressure sensitivity, tilt response, and varied texture—this set empowers artists to produce better work with less friction. Whether you are refining a professional portfolio or simply enjoying the therapeutic act of drawing, these tools provide the reliability and responsiveness required to bring your vision to life.