Mastering Digital Illustration with Feathers Procreate Brushes
Digital illustration has evolved from a niche hobby into a professional standard for artists, designers, and content creators. Among the myriad of tools available, Feathers Procreate Brushes stand out as a specialized asset for adding organic texture and dynamic movement to digital artwork. Whether you are illustrating a fantasy character, designing intricate patterns, or simply exploring decorative elements, these brushes offer a streamlined way to achieve complex results. However, many users overlook critical compatibility details and workflow optimizations, leading to frustration rather than creativity. Understanding how to properly integrate these tools into your iPad workflow is essential for maximizing their potential.
Understanding Compatibility and Platform Limitations
The most common mistake artists make when purchasing digital assets is assuming universal compatibility. It is vital to recognize that Feathers Procreate Brushes are designed exclusively for the Procreate application on Apple iPad. They will not function in Adobe Photoshop, Clip Studio Paint, or any desktop-based graphic editing software. This limitation is not a flaw but a feature of how Procreate handles brush engines, which rely heavily on the iPad’s specific touch and pressure sensors.
Attempting to use these files on unsupported platforms results in wasted time and money. Before purchasing, verify that you have an iPad capable of running the latest version of Procreate. If you primarily work on a desktop computer or use Android tablets, these brushes will not serve your needs. For professionals who switch between devices, it is advisable to keep a separate library of vector-based or standard raster brushes for cross-platform consistency, reserving these specialized feather tools for mobile-specific projects where their pressure-sensitive dynamics can be fully utilized.
The Importance of Pressure Sensitivity in Organic Textures
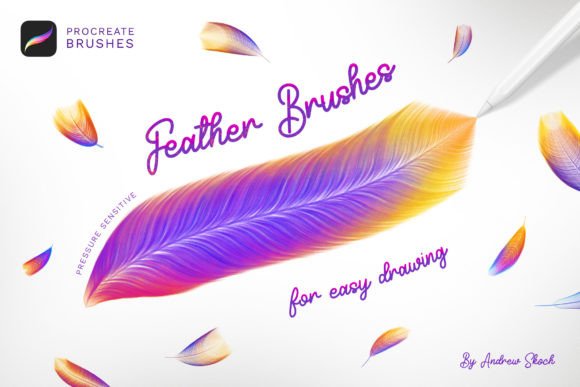
One of the standout features of this brush set is its pen pressure sensitivity. Many beginners treat digital brushes like static stamps, pressing down with uniform force. This approach negates the primary advantage of using Feathers Procreate Brushes. The set includes 13 different feather effects, each designed to react to the velocity and pressure of your stylus. When used correctly, a light touch creates delicate, wispy barbs, while heavier pressure produces dense, structured plumage.
A frequent oversight is ignoring the learning curve associated with pressure control. Artists often complain that the brushes look "messy" or "uncontrolled," when in reality, they are simply not adjusting their hand pressure to match the brush’s intended behavior. To avoid this, spend ten minutes practicing basic strokes on a blank canvas before starting a project. Focus on varying the weight of your hand to see how the brush transitions from thin to thick. This practice ensures that when you begin your actual illustration, you can draw decorative feathers with confidence and precision, achieving that sought-after fantasy effect without excessive editing.
Optimizing Workflow with Specialized Coloring Tools
Beyond the standard drawing tools, this set includes a special brush for coloring and a special brush for barb detailing. A common misconception is that these tools are redundant if you already have a favorite shading brush. However, these specialized brushes are engineered to interact with the feather textures specifically. The coloring brush is designed to lay down color in a way that respects the underlying structure of the feather, preventing the flat, plastic look that often plagues digital art.
Many users skip these specialized tools, opting instead for generic airbrushes or hard round brushes. This decision often leads to a disconnect between the texture and the color, making the feather appear pasted on rather than integrated into the artwork. By utilizing the included coloring brush, you maintain the organic feel of the feather while adding depth and dimension. For best results, use the barb brush to refine edges and add fine details after the base color is established. This layered approach mimics traditional media techniques, resulting in a more polished and professional final image.
Installation and Organization Best Practices
Proper installation is the first step toward a smooth creative experience. The process is straightforward: download the file directly to your iPad, click on the Feathers_by_Sko4.brushset file, and Procreate will automatically install the brushes. They will appear at the top of your brush list. However, leaving them at the top of the default list can clutter your workspace, especially if you have hundreds of other brushes.
A better approach is to immediately organize these brushes into a dedicated folder within Procreate. Create a new brush set named "Feathers" or "Textures" and move the 28 procreate brushes into this custom group. This organization saves time during the creative process, allowing you to locate the specific feather effect you need without scrolling through unrelated tools. Additionally, renaming individual brushes within the set to reflect their specific use case (e.g., "Soft Down," "Sharp Quill," "Base Color") can further enhance efficiency, particularly for freelancers and educators who need to demonstrate techniques quickly.
Avoiding Overuse and Maintaining Artistic Balance
While these brushes make it easy to draw decorative feathers, there is a risk of overreliance. Beginners often fill every available space with intricate feather details, resulting in visual noise that distracts from the main subject. The key to effective use is restraint. Use the feather brushes to accentuate specific areas, such as wing tips, collars, or decorative borders, rather than covering entire surfaces.
Consider the composition of your piece. Ask yourself whether the feather texture adds value or merely adds complexity. In many cases, combining the detailed feather brushes with simpler, flat shapes creates a more striking contrast. This balance between detail and simplicity is what separates amateur experiments from professional illustrations. By using the 13 different feather effects strategically, you can guide the viewer’s eye and create a sense of movement without overwhelming the design.
Evaluating Value for Different User Groups
For hobbyists and bloggers, Feathers Procreate Brushes offer a quick way to elevate social media graphics and personal projects. The ease of use means that even those with limited drawing experience can produce visually appealing results. For professionals and entrepreneurs, these brushes can speed up the creation of marketing materials, book covers, and product designs that require organic, natural elements. Educators can use them to teach students about texture, pressure, and digital layering techniques.
However, it is important to manage expectations. These brushes are tools, not replacements for fundamental artistic skills. They will not automatically correct poor anatomy or flawed perspective. Users should view them as enhancements to their existing skill set. Before making a purchase, consider your current workflow. If you frequently illustrate birds, fantasy creatures, or bohemian designs, this set is a high-value addition. If your work is primarily geometric or typographic, the utility may be limited.
In conclusion, Feathers Procreate Brushes provide a powerful, dynamic solution for adding realistic and decorative feather elements to digital art. By understanding compatibility constraints, mastering pressure sensitivity, utilizing specialized coloring tools, and organizing your workspace effectively, you can avoid common pitfalls and unlock the full potential of this asset. Whether you are a beginner looking to experiment or a professional seeking efficiency, these brushes offer a versatile addition to your digital toolkit, provided they are used with intention and technical awareness.